Our Woodland Fairy Party
October 20, 2012

Last month we celebrated Amanda’s 8th Birthday. Amanda is kind, bright and a delight to be with. Matt and I take little credit for her outcome thus far. This parenthood thing is all trial and error – we are honestly winging it day by day! She makes our jobs easy and we are so proud of the little person she is becoming.
This year, Amanda requested a “Fairy Party”. Not being of the pink-frilly-type, I immediately started scheming on how we could move this theme away from the typical store-bought-glittery-sweet event to something that suited Amanda (and her mom/ party planner) a bit more. One of Amanda’s favorite pastimes is building back-yard fairy houses. Inspired by Tracy Kane’s book, “Fairy Houses”, Amanda builds fairy houses in hopes of attracting forest critters and fairies. In line with the story’s teaching, she uses only natural, found materials. Amanda and friends spend hours constructing these delicate leaf and twig structures – complete with treasures such as “leaf tacos” for the hungry fairies and elves that may take shelter amongst the tiny homes.
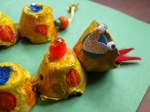
With this idea in mind, Amanda and I put on A Woodland Fairy Party for 5 of her dearest friends and of course her brother and sister. We devised a fairy-themed menu that included Fairy Be rries, Lady-bug Apples, Gnome-made Granola, Pixie Pop and Toad Stool Cake. Each child crafted take-home versions of fairy houses using terra-cotta pots, leaves, twigs, flowers and moss. The houses turned out darling!! The children were so creative – devising little door bells and porch over-hangs and soft beds for the fairies.
The party was so much fun to plan and give – and the little terra-cotta fairy houses that we made are holding up well in the garden. A few rolly-pollies have been found amongst the houses – if only we could catch a real fairy!


Valentines’s Day 2012
February 20, 2012
A friend recently pointed out that it had been a long time since my last blog post. She was right…I looked it up…the last time I posted was in late March 2011. Not coincidentally, I started back to work on April 12th 2011. The last 10-months has flown by…life is so full but so fun. My cup runneth over! As does my schedule, my sink of dirty dishes, my hamper….
This past week included lots of Valentine fun…here are some pictures our projects.


Kinder-Cakes
March 28, 2011
A Kindergarten Cupcake Collage
In my eagerness to be mommy extraordinaire, I maybe over-extended myself a bit this year. I admit it. I got excited about all of the volunteer opportunities that presented themselves at Amanda’s school – Art Docent, Garden Docent, Art Reflections, Teacher Appreciation Lunches, Class Parties…and signed-up for…well…a couple of things. My brother-in-law (a former elementary school teacher) had warned me that there would be MANY opportunities to contribute and I should be careful about over-committing. I don’t know what part of my charming (wink) personality gave me away as an over-achieving-yes-mom…but he had me completely figured out.
Honestly, my volunteer experiences — if not a bit hectic — have been fantastic. I’ve meet many wonderful parents who are incredibly generous with their time and talents. It’s been inspiring to see care-givers (not just moms but dads, grandparents, nannies, aunts, uncles) work together to facilitate so many activities and experiences for our children, especially as public school budgets continue to shrink. As I prepare to return to the workforce I realize my day-to-day involvement will wane. I feel very fortunate to have had this time to get involved…not all parents are afforded this opportunity.
I am excited and proud to share with you my favorite contribution to-date – a collaborative art project that several other Art Docent volunteers and I recently completed with Amanda’s kindergarten class. Our task was to work with the children in Mrs. Sivila’s kindergarten class to create a work of art that would be auctioned at the PTA’s annual Edison Elementary Gala Benefit and Auction. It wasn’t until after I accepted the request to lead this project, that I learned bidding for projects *start* at $250! And many pieces garner several hundred more by night’s end…PRESSURE!
But so much fun! I came up with the idea of having a giant cake pedestal filled with paper cupcakes – each kindergartener contributing his or her own cupcake to the masterpiece. Over brunch and coffee one Sunday (and wine & pizza one Friday) we – Heather, Susan, Rebecca and I – hatched a plan. The children would use tissue paper, crepe paper, beads, glitter, found objects and LOADS of imagination to create the most colorful, whimsical cupcakes you’ve ever seen!
I absolutely loved seeing the kids tackle this project – they were truly inspired, worked intensely, used copious amounts of glue and…oh…the glitter. Kindergartners and glitter…they are creatures possessed!
We were all thrilled with the outcome and can’t wait to show the children their masterpiece. Next Saturday is the big auction…hoping our piece brings big numbers at auction!

Chinese New Year
February 26, 2011


about it at school, there are festivals, parades, special exhibits at the
museums. I don’t remember it being a big
thing growing up in Southern California. Did I miss something?
night when I just couldn’t be bothered to cook.
And this past weekend it proved to be a great rainy-day craft inspiration. We were all cooped up over a long President’s
Day weekend – let me re-phrase that – a LOOONG RAINY WET COLD President’s Day
weekend. Softball practice was cancelled, the backyard a huge mud-pit, mom, dad, kids were all getting a bit
antsy. So what to do?
Don’t need the calories.
so much fun! I think I could get into this Chinese New Year thing. Next year I think I’ll get some of those
shiny little red envelopes – so fun! I’m so easily amused.
Heart-In-Hand
February 15, 2011


What could be sweeter than a heart-cookie in the pudgy little hands of a 2-year-old boy?
Hmm…maybe said 2-year-old boy down for a long nap???
Because Amanda had already decorated Valentine’s Day cookies TWICE by the time we got around tomaking cookies, we decided to switch things up a bit this year. Instead of our tried-and-true cut-out-cookies, we made these darling peanut butter cookies with jam hearts. The kids and I had such a good time and lemme tell you – this recipe is a keeper!
Like traditional peanut butter cookies, this recipe (Martha Stewart Living, February 2011) has you
shape the dough into balls and smoosh (my word, not Martha’s) them into flattened discs. Then you use your
fingertips to create little heart-shaped divots in the dough. The look on Reed’s face as he slammed his
(pudgy little) hand down onto the balls of dough was worth the inevitable mess created while baking with children.
And I take it back…the sweetest thing is a hug and a sloppy kiss from that 2 ½ year-old. Forget about the cookies.
Peanut-Butter-And-Jam Heart Cookies
Makes 2 dozen ~ pre-heat
oven to 350◦F
Whisk together flour,
baking powder, and ¼ teaspoon salt. Beat
butter and sugars with a mixer on medium speed until pale and fluffy. Beat in peanut butter and then the egg. Reduce the speed to low, and beat in flour
mixture until dough forms. If the dough is sticky (mine was actually a bit dry) you can refrigerate it for 5-10 minutes.
Pre-heat the oven to 350◦F. Using about 2 tablespoons of dough, roll dough into balls. Arrange them on a parchment
lined baking sheet about an inch-and-a-half apart. Press (smoosh) into 1 ¾” rounds. Press hearts into the centers using your fingertips.
Refrigerate for 20 minutes.
Bake for 12 minutes. Remove from the oven and reshape the hearts. I used the wrong end
of my wooden spoon to deepen the divots and fine-tune the heart shapes. Fill the hearts with jam and return to the
oven for 5-7 minutes.
An Old-Fashioned Garden Party – Amanda’s 6th Birthday
October 10, 2010
 For her 6th birthday, Amanda decided she wanted to have an “Old Fashioned Garden Party”. This theme was inspired by a special program she attended this summer at the Baldwin Estate at Lake Tahoe. While at the Baldwin Estate, Amanda learned what it was like to be a child growing up in the 1920’s. With the aid of both a nanny AND a maid, she decorated her own hat, learned the etiquette of Gatsby era children and attended a garden party in a fancy gazebo. The girls ate cookies and drank lemonade…they even played croquet. The day certainly made an impression on her!
At our Birthday Garden Party, Amanda greeted her girlfriends with a curtsy. We sat on the lawn and decorated straw hats with flowers and ribbon. We served lemonade (pink of course!) and ate tea sandwiches. We didn’t have a nanny or a maid…although one could argue that I play both roles on a daily basis (wink).
I made a cake for the occasion – a square chocolate layer cake. I had my first experience with fondant – which was pretty fun. I’ve never liked eating fondant, but I really like way it looks – adds a really graphic quality to the decoration. I frosted the cake with a typical butter cream, but then adorned the top with daisies and ladybugs made of fondant.
Birthday Bars
October 5, 2010

Amanda had the very special honor of having the first birthday in her class this year. AND she was the first to turn SIX! Life is so good in Kindergarten! Of course we wanted to take a treat to class to celebrate her big day.
Although cupcakes weren’t specifically banned, we were encouraged to bring something a bit healthier – popcorn, fruit or maybe a non-food item. I had been wanting to try Ina Garten’s homemade granola bars recipe for ages, and this seemed like my perfect opportunity.
I tweaked the recipe a bit – I added chocolate chips to made the bars a bit more celebratory. I reduced the sugar and baking time. They turned out great! But the idea that these bars are “healthy” might be a stretch…I’d say candy bars with a conscience! They were pretty yummy!
For serving, I made little envelopes out of colorful craft paper
Granola Bars
Pre-heat oven to 350◦F
Non-stick vegetable oil spray 2 cups of old fashioned oats ½ cup sliced almonds 1 cup unsweetened, shredded coconut, loosely packed ½ toasted wheat germ 3 tbsp unsalted butter 2/3 cup honey ¼ cup light brown sugar, lightly packed 1 ½ teaspoons pure vanilla extract ¼ teaspoon kosher salt ½ cup dried cherries 1 cup chocolate chipsSpray an 8×12-inch baking dish and line it with parchment paper – then SPRAY THE PAPER AGAIN. I didn’t do this the first time and the paper stuck.
Toss the oatmeal, almonds and coconut together on a sheet pan and bake for 10-12 minutes, stirring occasionally, until lightly browned. Transfer the mixture to a large mixing bowl and stir in the wheat germ.
Reduce oven temperature to 300◦F
Place butter, honey, brown sugar, vanilla and salt in a small saucepan and bring to a boil over medium heat. Cook and stir for a minute, then pour over the toasted oatmeal mixture. Add the dried cherries and chocolate chips. Stir well.
Pour the mixture in the prepared pan. Use a spatula or your fingers (careful its hot!) to lightly press the mixture into the pan. Bake for 12-15 minutes, or longer for crunchier bars. Cool for 2-3 hours or over-night, then cut into bars.
Have I taken this granola thing too far???


Homemade Granola
September 14, 2010
 I have the best time making homemade granola! I know that sounds like an odd thing to get a kick-out of, but I do. Maybe it’s because I like coming up with new and interesting dried fruit and nut combinations…or maybe it’s just because it tastes so much better than the commercially produced variety.
Homemade granola is really easy to make and has a lot less sugar. The entire family enjoys granola. Reed thinks the dried fruit is candy. Amanda likes me to pack some in her backpack for a mid-morning snack. Matt eats his by the handful right out of the jar that we keep on our counter. But I love mine over a heap of fresh fruit with a dollop of plain yogurt.
The granola shown in these photos was made with dried apricots, blueberries, walnuts and almonds. I especially love the color contrast between the dark blueberries and the bright orange apricots.


Here’s the general recipe…but I switch things up depending on what I have on hand.
Homemade Granola
Makes about 10 cups ~ pre-heat oven to 300◦F
Non-stick vegetable oil spray 5 ½ cups of old fashioned oats 2 cups of nuts (I typically use pecan pieces and slivered almonds) ¾ cup unsweetened coconut ½ cup lightly packed brown sugar ½ toasted wheat germ 2 teaspoons of ground cinnamon ½ teaspoon of ground nutmeg 1 cup of whatever juice you have on hand – I’ve used apple, prune, orange juice or a combination 6 tablespoons of vegetable oil ¼ cup maple syrup 2 teaspoons of vanilla 2 cups of dried fruitSpray two rimmed baking sheets with non-stick spray. Mix oats, nuts, coconut, brown sugar, wheat germ, cinnamon and nutmeg in a large bowl. Combine juice, oil and syrup in a small sauce pan and heat until just boiling. Remove from heat and stir in vanilla. Drizzle the juice mixture over the oat mixture and toss to coat. Divide the granola between the two baking sheets and spread evenly. Bake the granola until golden brown – this takes about 50 minutes. Stir occasionally and don’t be afraid to let the granola get dark golden. Too many packaged granolas aren’t crispy enough, in my opinion. Divide the dried fruit between the two sheets and toss with granola. Bake another 10 minutes. Cool completely. I like to divide the batch into 4 zip-lock bags and freeze. I take a bag out when our jar gets empty!
Back to the drawing board!
August 12, 2010
Dare I say the hiatus is over? After many months of non-blogging (ha! ’cause I was super prolific before!) I’m ready to start recording my creative doings and musings once again.
Let me start by saying this: Phew! That was a long pregnancy! But even through the nausea, perinatal depression (yes, it can happen during instead of after) and the general discomfort of growing a human being, I realize I did manage to try out new recipes, do some creative stuff with the kids, dig in the garden and even took a few painting classes. Time and time again, I find that it’s the creative stuff – whether in the kitchen, at the sewing machine or with a sketchbook – that keeps my spirits up and makes me feel rejuvenated when I get stuck in a rut.
Before I start posting about the stuff my studio assistants (Amanda & Reed) and I have been doing over the last months, I leave you with this photo…one of my top three BEST creations…Lily Annalise! A masterpiece, if I do say so myself!

Lily smiles!
Wine and Cupcakes?
March 9, 2010
 Wine…love it.
Cupcakes…can’t get enough.
But the two of them paired together? I wasn’t sure about this – would it be really fun or really gimmicky? When my dear friend Anne scheduled this event at the Saarloos & Sons Tasting Room in Los Olivos, CA for our group of friends off for a weekend without husbands, kids, dogs or responsibility — I was just glad our Anne had the gumption to do some research and make a plan. All I’d done to plan for the “girls’ weekend” was to think past yoga pants and pack my new stylin’ jeans from Target’s maternity section (I know, sad.) And really…who could go wrong with wine & cupcakes?
The truth is…this group of girls (ok – women) would have fun no matter where we went together…its just that sort of friendship. We’ve known one another since the days of elementary school — when cupcakes were something that came out of a Duncan Hines box (not a trendy gourmet item) and wine was something our parents drank. So after kinda-sorta sleeping in, we headed into the Santa Ynez Valley inland from Santa Barbara through the rain-soaked roads to Los Olivos. What a quaint little town! Complete with antique shops, boutiques, nice restaurants, coffee shops…and of course, tasting rooms. And it must have been meant to be…because the rain stopped right as we arrived in town.
We popped into a couple of shops and did a tasting at Byron. We had a lovely lunch at Los Olivos Cafe and then headed over to Saarloos & Sons Tasting Room for our wine & cupcake pairings. I loved the design of this place — it was fresh and hip, yet comfortable and homey. We had a great time trying wines (which were fantastic!) and enjoying the mini-gourmet cupcakes, prepared by Enjoy Cupcakes (who, by the way, operate out of a vintage trailer!). And its funny…the cupcakes and wine honestly went well together!? Who knew!
So what could be better than wine and cupcakes? Nothing — except life-long best friends spending the day together.


